tl;dr: Customize your dependencies using phpdocker.io and put the result files in the root or your project, then edit your .env files accordingly and run docker-compose up -d. 🐳
Personal background
When my company started to migrate from PHP 5 to PHP 7 I had to work on different applications with different language versions. At the time I used to have a personal virtual container that ~reflected the configuration of a production machine, but it was slow because I used to develop on it using sshfs. So, it was common for me to have some applications running locally on my machine, but handling two different PHP versions was not easy.
The solution was to start considering having each project completely platform independent, and my main objective was to be able to reach a point were the PHP version installed on my Mac was irrelevant.
Introduction
We will consider a very basic Symfony application running on any version of PHP with any database attached. Of course, the database is not required, but I will show you how to attach an external dependency to the project.
In the end you will have a project that can be installed on any machine running Docker Desktop (or docker-compose on Linux), with PHP 7.4 and MySQL 8.
Prerequisites
docker-composeinstalled (bundled with Docker Desktop on Windows and MacOS) [Instructions]- a text editor
- (optional) a client to connect to the database instance we will create
Configure your docker-compose.yaml
This is the main file that will tell docker-compose what containers to create using which images. It will also specify other piece of information like the ports exposed by the instances, their names, the working directory of the project.
We will make use of phpdocker.io to use a simple web interface to configure our dependencies.
- Point your browser to phpdocker.io generator page.
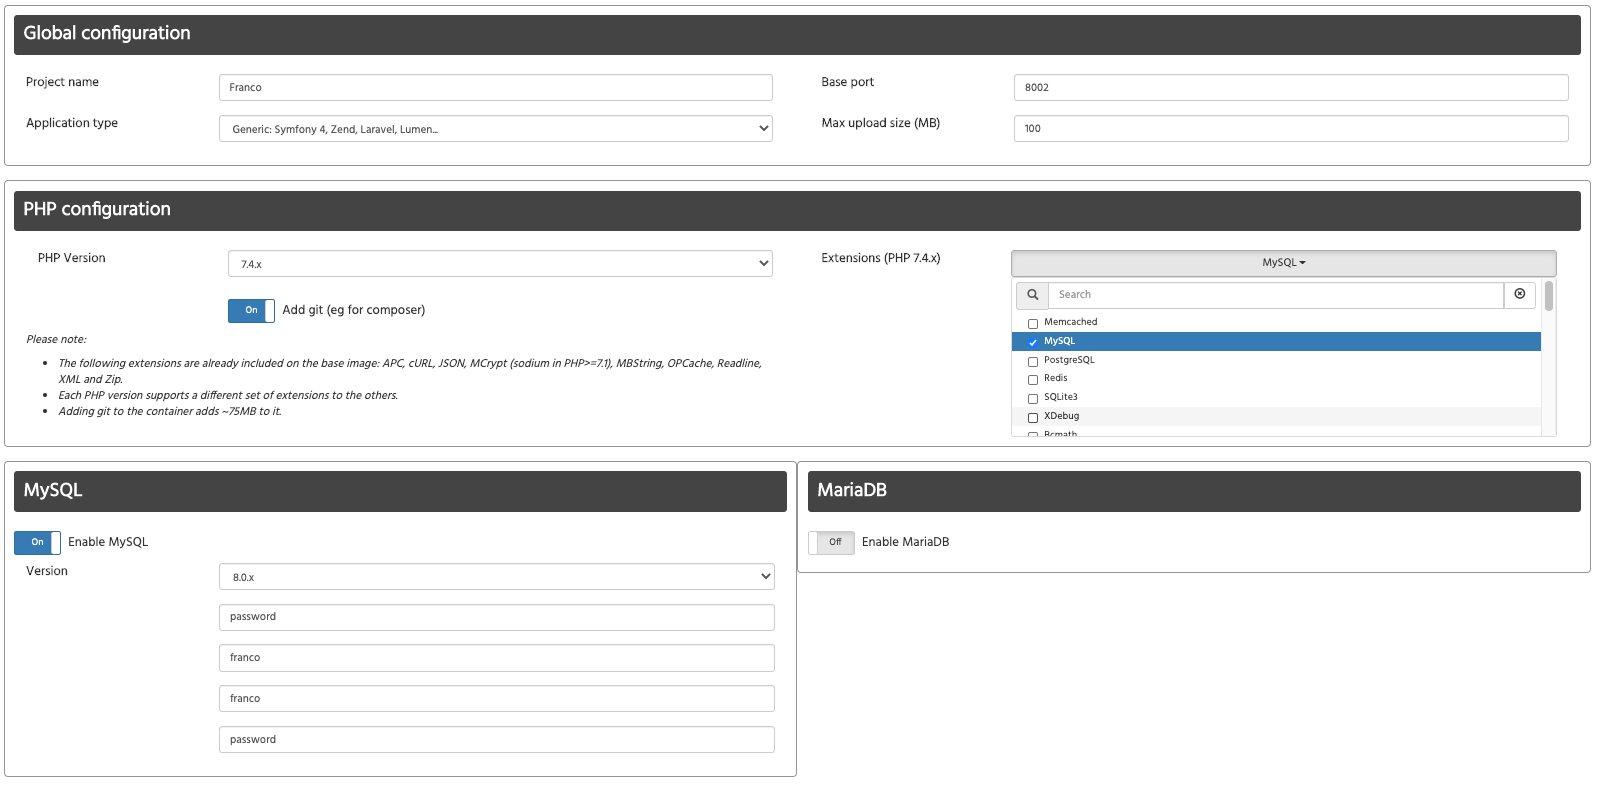
- Fill the project information fields with the name and the base port (something like
8080or8001, it’s up to you) - Leave the preselected PHP version (at the time of writing, is 7.4) and check the “Add git” toggle.
- On the right, select the extensions you need, I will select MySQL.
- (optional) Toggle the “Enable MySQL” option
- (optional) Fill the fields regarding the database name, root password and user credentials.
- Click “Generate project archive”.
If something on the website has changed or is not reachable, you can download the result here.
Now we need to unarchive the folder inside our project, so that we have the file docker-compose.yaml at the root of our project with the folder phpdocker at the same level.
Tip: you may want to rename the name of the folder to something more general like docker, but remember to change the paths inside docker-compose.yaml.
Start the containers
We can now start everything by running docker-compose up -d in our terminal, in the root of our project.
Docker will download all the images required to create the containers and then start them.
If you just cloned your project, you may need to run composer install from inside the container. To do so, we have to specify the container in which to run the command: docker exec -it franco-php-fpm composer install.
You can always log into the container and run any command you like with docker exec -it bash.
The project is served at the address http://localhost:8002.
Editing the .env
If your project does not have an external dependency, you can skip this step.
Your project may have different .env files for each environment with its dependencies.
We will now edit your development .env to allow our application to connect to the instance of MySQL we just created.
From the docker-compose.yaml file, look at the environments values set for the MySQL container:
    mysql:
      ...
      environment:
        - MYSQL_ROOT_PASSWORD=password
        - MYSQL_DATABASE=franco
        - MYSQL_USER=franco
        - MYSQL_PASSWORD=password
      ...
In your .env file, change the value for the DATABASE_URL variable to this:
###> doctrine/doctrine-bundle ###
DATABASE_URL=mysql://root:password@mysql/franco
###< doctrine/doctrine-bundle ###
In the URL, “mysql” will be resolved to the container’s internal address of the database.
The application is now connected to the new database instance we just created, that is of course missing a schema.
We can connect to the database as we would with any other instance by using the address http://localhost:8004 and the same credentials we used for the project, so that we can run any query manually.
We can automatically create a schema from the entities from inside the php-fpm container. You can run any migration command, but to be fast we can use these (be careful not to point to any shared database, this will wipe everything):
$ bin/console doctrine:schema:drop --full-database --force -n
$ bin/console doctrine:schema:create -v
And if you have any fixture to load:
$ bin/console doctrine:fixtures:load -nEt voilà! Everything is ready and set up.
Thank you for getting this far! ❤️
If this guide was helpful to you or you have any doubt, consider reaching out to me on Twitter.